Night Exterior Rendering: How to Show Facade Lighting, Blue Hour and Lit Windows
Short answer: There are two main routes: describe the building from scratch and set the time of day to blue hour, night or late night, or upload a view of your own model or a photo and switch its lighting to blue hour or night. In BentoMesh, a Turkish-first AI visualization platform for architects and designers, both run in a desktop browser through Render Lab's Generate from Scratch mode and the Create from Scratch option on the Create Render page. From scratch you can add facade, landscape and pool lighting and a lit interior; with a source image, BentoMesh is instructed to take light only from fixtures and openings already in it, without adding LED strips or spotlights, and the result is checked against the source; this is a goal, not a guarantee. The result is a presentation image, not a lighting design, lux calculation or electrical plan.
Batuhan Oğan · 14 min read · Published: 2026-10-15 · Updated: 2026-10-15
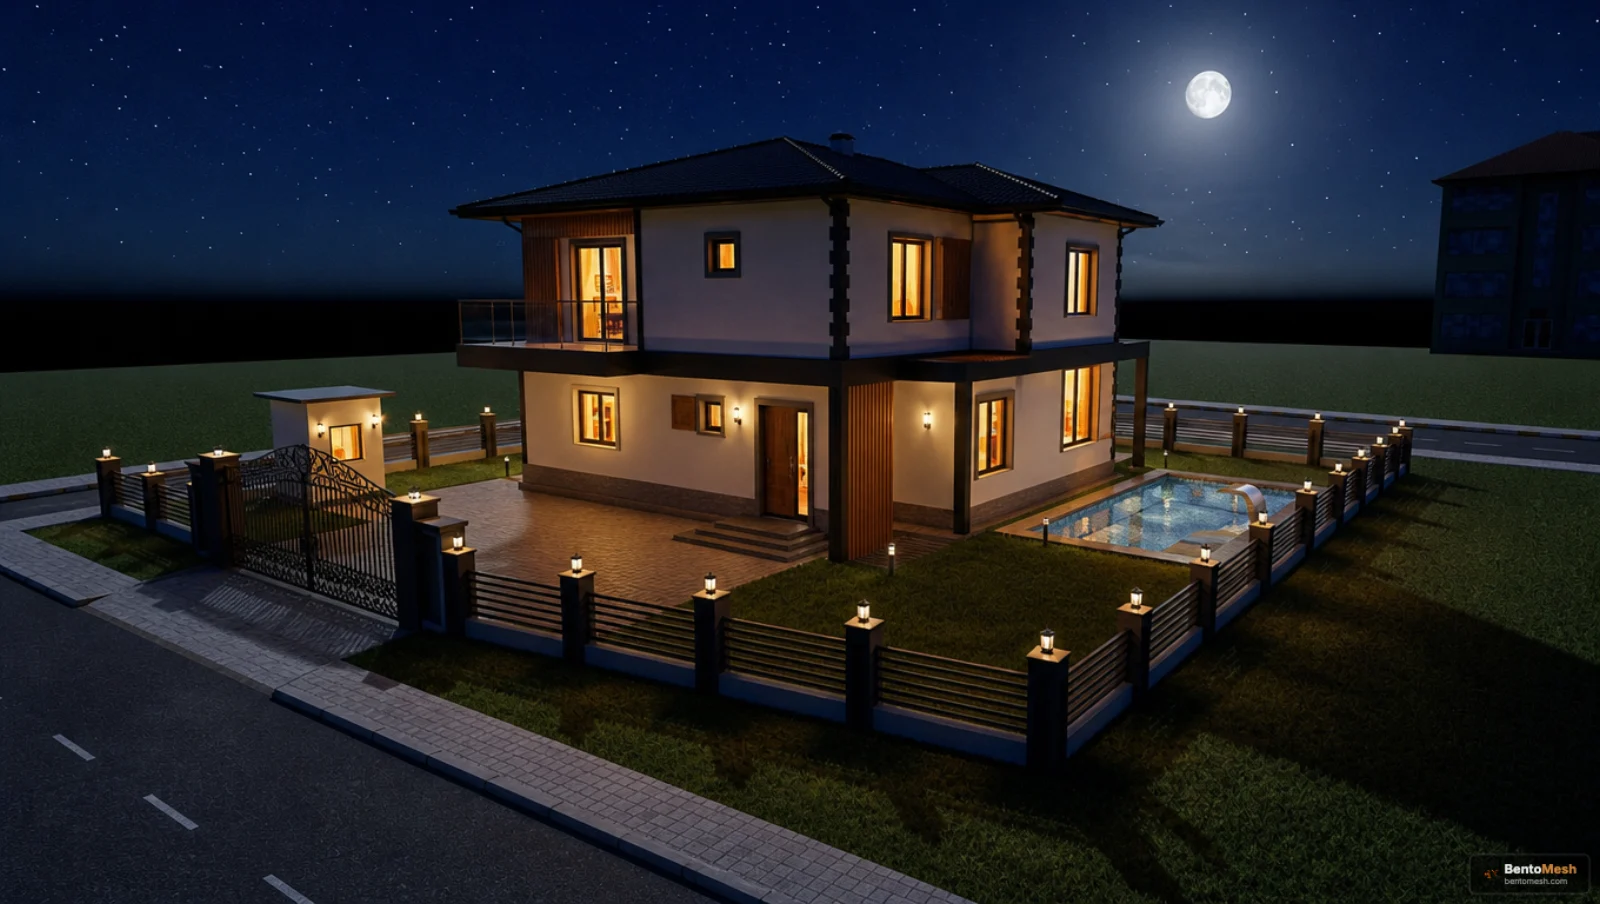
When is a night render worth making?
A night render earns its place when the evening look of a building is part of the decision: a sale, a client presentation or a jury. It completes the daytime image rather than replacing it: the daytime render explains massing and materials, the night render shows how light draws the building and where the entrance is.
- Residential and villa marketing: Buyers and investors want to see the house after dark; one frame with lit windows and a readable garden path answers that.
- Facade lighting decisions: Wash the facade, light only the entrance and the garden, or keep the exterior dark? Seeing those options from the same viewpoint makes the conversation with an owner concrete.
- Studio reviews and competitions: A blue-hour or night image adds a second reading without repeating the daytime story. Check first whether the brief allows AI-generated images.
- Homeowners: Before you spend money on garden or terrace lighting, a rough image helps you see the direction.
As a rule of thumb, present the night image as a pair with a daytime image from the same viewpoint. Darkness hides detail; the daytime image shows what is being hidden.
Blue hour, night or late night: which should you choose?
Blue hour is the twilight when the sky is still deep blue and the lights are already on; night is a dark sky with only artificial light; late night is a darker scene lit by moonlight plus artificial light. In BentoMesh's Generate from Scratch form, these sit on the Time of day strip with the short descriptions below.
| Option | How the interface describes it | Use it when |
|---|---|---|
| Blue hour | Deep blue twilight, lights on | The silhouette must still read, and the lights should show |
| Night | Dark sky, only artificial light | You want to show the lighting scheme itself |
| Late night | Moonlight and artificial light | You want a quieter, more dramatic mood; detail is lost most here |
| Sunset | Warm orange glow on the horizon | A warm transition frame next to the night set |
In practice, blue hour reads better in most presentations, because the light left in the sky separates the roofline from the background; at full night a dark facade can merge into a dark sky. Choose night to sell the lighting scheme and blue hour to sell the building, or render both from the same angle and compare.
The Light section also has a Colour temperature setting: Warm 2700 K, Neutral 4000 K and Cool 5000 K. It sets the mood of the image, not a fixture specification; check the real fixture's rating on its data sheet.
How do you generate a night exterior from scratch?
Open Generate from Scratch in Render Lab, or open the Create Render page and choose Create from Scratch; then choose the Exterior tab, describe the building, set the time of day to one of the night options and tick the exterior light sources. Without a source image the scene is built from your choices, so this route gives you the most freedom over light.
On a phone, the form is different: the options in this section and the next are in the desktop (or wide-screen tablet) browser form. Phone-width screens show a simpler form without the Blue hour, Night and Late night strip, the four exterior light sources or the source-image lighting options.
Step by step
1. Tab and building: Choose Exterior, then the building type and architectural style.
2. Site and setting: Pick the setting and season; for a snowy evening, set the sky to Snowy.
3. Time of day: In the Light section, choose Blue hour, Night or Late night.
4. Light sources: There are four exterior-only options: Facade lighting, Landscape lighting, Pool lighting and Lit interior. You can tick several. If you tick none, artificial light is added automatically at night; tick them yourself to decide where light comes from.
5. Sky: After rain asks for wet, reflective ground, worth trying for lights reflected on paving. The Sun rays mood is disabled at night.
6. Camera: For facade lighting, try 3/4 view or Front elevation; to show landscape and pool light from above, Low drone (about 15 m) or Bird's-eye (about 60 m, looking down at roughly 45 degrees).
7. People and note: For exterior scenes there is also a Lively option for a crowd. In Your note you can write in any language; if it conflicts with your choices, the note wins.
One caveat: every from-scratch run builds a new scene, so the building will not be identical between runs. That is fine for concept images; once the design is fixed, use the source-image route below.
Can you turn your own model or photo into a night render?
Yes, with one important difference: when you upload a source image, BentoMesh is instructed to take light only from fixtures that are visibly present in it and from openings that already exist. Adding an LED strip, spotlight, wall light or glowing band that is not in your source is against the rule the generator is given, and the result is checked against the source. If the check catches a difference, the image is generated once more; if the difference remains, the result arrives with an on-screen warning. The check may not catch everything, so compare the result with your source yourself. The goal is to show your design, not to invent fixtures for it.
Upload a source image in the Generate from Scratch form in a desktop browser (a sketch, model screenshot or photo, up to 15 MB) and the camera, geometry and scale are kept. The Light section narrows to five choices, Keep source lighting, Daytime, Golden hour, Blue hour and Night, with a note that lighting uses only existing openings and fixtures. Light mist and sun rays are not applied either.
What this means in practice
- No exterior fixtures in the model should mean no exterior light in the render. If the model has no wall lights, bollards or pool lights, the AI is told not to invent them, and a dark corner may stay dark. That is the rule working, not a bug. If a light that is not in your source still appears, treat it as a proposal and regenerate from the same view.
- Model the fixtures and keep them visible. Light can only come from a fixture the source view actually shows.
- The plugins' standard viewport render follows the same rule. When you render the current view in the SketchUp and 3ds Max plugins, the Blue hour and Night options also aim to use only fixtures and openings already in the model (plugins page).
- Compare with the source. Readability comes from exposure, not new light, so the result may be dimmer than expected. Check windows, mullions and massing lines against the source view.
If you want to see a light that is not in your model
Ask for it as a separate step with Edit Render in Render Lab. The Lighting task's examples include “Add warm recessed spotlights to the ceiling”, and the Add task adds only the item you name; outside, you might write “add a wall light on each side of the front door”. You are now testing a proposal, not showing the design, so compare the result with the source and label it as a proposal.
How do you test facade lighting ideas with AI?
Render the same view at the same hour with different lighting layers and compare them side by side; the four exterior light sources in Generate from Scratch let you add one layer at a time.
- Lit interior: Warm light glows through the windows and the house reads as occupied; in residential work, often the strongest single layer.
- Facade lighting: Light washing the facade surface. It suits textured materials; on a plain plastered wall, too much of it flattens the facade.
- Landscape lighting: Uplights along paths and trees that make the route to the entrance readable.
- Pool lighting: Underwater light that makes the pool a focal point; keep it from competing with the facade.
A sample test set
(Example scenario) You are discussing lighting direction with the owner of a two-story villa at concept stage. Keep Blue hour, a 3/4 view and the Warm setting fixed and change only the light sources.
| Option | Light sources ticked | Question to ask |
|---|---|---|
| A | Lit interior | Is the house inviting enough without exterior light? |
| B | Lit interior, Landscape lighting | Do the entrance and the garden path read clearly? |
| C | Lit interior, Landscape lighting, Facade lighting, Pool lighting | Is it too much? Does the architecture go flat? |
Read these as concept images: each run is a new scene, so building details can differ, and what you compare is the direction and intensity of light. Once the design is fixed, model the fixtures and use the source-image route, or add layers to one chosen frame with Edit Render. A common rule of thumb is that light needs a hierarchy: the entrance and one feature surface lead and the rest stays quieter. When everything glows equally, depth disappears.
Style and night together
In Style Comparison, choose the exterior mode (labeled Dış Cephe), upload a building photo and pick a few exterior styles. With the daylight option (Gün Işığı) set to night (Gece), each style is requested as a night scene with facade and landscape lighting, glowing windows and a deep blue sky; landscape and setting options are there too, and results download as a ZIP. Because the tool changes the facade's materials and style, it answers “how does each style look at night?”, not “how should this building be lit?”.
An image shows a direction; it does not make the decision. Fixture choice, aiming, glare, light pollution and light spill onto neighboring plots are for local rules and a lighting or electrical professional.
How do you use a night render in a presentation or a video?
Pair the night image with a daytime image from the same viewpoint, upscale it if needed, add people for scale and turn it into a short clip; each step is a separate tool.
| What you want | Tool | What to know |
|---|---|---|
| Fine-tune the light | Edit Render in Render Lab, Lighting task | Built to change only light, shadows and time of day; write one change such as “dim the facade light slightly” or “make the entrance light stand out”, then compare with the source |
| Enlarge and sharpen | Upscale | 2x and 4x for now; inspect dark areas afterwards |
| Add people and cars for scale | Add People & Cars | Adds people and cars to exterior scenes; architecture, camera and light are kept; figures are placed automatically |
| A short cinematic clip | Render to Video | Adds camera movement to one frame; not a free walkthrough or 3D animation |
| An aerial fly-over | Drone Shot | Produces a cinematic aerial video from a building image |
| A second opinion | Render Analysis | Gives a 1-10 design score, strengths, critique and tips |
- Order matters. Finish lighting and materials first and add figures last, as the Add People & Cars tool itself recommends.
- Avoid very dark frames for figures. Blurry or very dark images make figure placement harder; a blue-hour frame is a better base.
- Watch the video end to end. Video tools generate motion from one frame, with no guarantee that window light and facade detail stay the same throughout; the tone of a night frame can also shift in the video.
- Label it. Under the image, add a short note such as “illustrative night view; not a lighting design”.
What can a night render not tell you?
A night render is a presentation and decision aid. Keep these limits in mind:
- It is not a measurement. Distances, fixture spacing and mounting heights cannot be read from the image.
- It is not a lighting design. It does not calculate lux levels, lay out fixtures, produce an electrical plan or estimate energy use, and it is not an official project document. On light pollution and light spill, local rules and a professional take precedence.
- There is no light calculation. The light is an estimate, not what a real fixture will cover.
- Detail disappears in the dark. Frames, joints and texture read poorly at night; decide materials on the daytime image.
- Geometry can change. Window count, roofline or mullion pattern may come out differently; BentoMesh does not promise geometry is fully preserved. Compare with your source.
- No new lights with a source image is a goal, not a guarantee. The generator is told not to add them and the result is checked against the source; if a difference is caught, you get a warning. Compare with your source anyway.
- Screens vary. Check the light's tone and Kelvin rating on the real fixture's data sheet.
- Processing happens in the cloud. Your image goes through the BentoMesh server and a third-party AI provider that produces the result; check permissions first for confidential projects.
- It is an illustration. In sales and listing material, say the image is illustrative.
- The free tier adds a watermark. Images made on the free tier carry a BentoMesh watermark; subscription plans do not.
- There is no Android app. The web tools run in a browser, and the only mobile app is for iPhone.
Registration is free; when you verify your email or phone number, or sign in with Google or Apple, a one-time welcome credit is added to your account, subject to the conditions on the sign-up page. Current packs are on the credits page. The same article is available in Turkish: Türkçe sürüm / Read in Turkish.
Frequently asked questions
How do I make a night render of a building?
In Render Lab's Generate from Scratch mode, or under Create from Scratch on the Create Render page, choose Exterior, describe the building and set the time of day to Blue hour, Night or Late night. Tick the light sources you want: Facade, Landscape or Pool lighting, or Lit interior. If you have a model or photo, upload it as a source image and choose Blue hour or Night; light is then meant to come only from existing fixtures. These options are in the desktop browser form; phones show a simpler form.
What is the difference between blue hour and night rendering?
At blue hour the sky is still deep blue and the lights are on, so the silhouette stands out. At night the sky is dark and only artificial light shows the scene; late night adds moonlight. As a rule of thumb, blue hour reads better in marketing images, while night better shows the lighting scheme itself. If unsure, render both from the same angle.
Will AI add new lights to my own model at night?
It is not supposed to. With a source image, BentoMesh is instructed to take light only from fixtures visible in it and existing openings, without adding LED strips, spotlights or wall lights, and the result is checked against the source. If a difference is caught, the result comes with a warning; this is not a guarantee, so compare it with your source. The standard viewport render in the SketchUp and 3ds Max plugins follows the same rule. Without fixtures the scene may stay dim. Model the fixtures you want, or test a new light with Edit Render and label that image as a proposal.
Can AI design my facade lighting?
It can show you a direction, not a design. In Generate from Scratch you can test facade, landscape and pool lighting and lit windows layer by layer and compare the results. The image does not choose fixtures, set aiming angles, calculate lux levels, control glare or produce an electrical plan. For a real installation, follow local rules and work with a lighting or electrical professional.
Why does my night render come out too dark?
Late night gives the darkest scene; blue hour reads better. With a source image and no exterior fixtures in the model, the scene is deliberately left dim rather than lit by new fixtures. From scratch, ticking light sources makes it clear where light should come from. A dark facade can also merge into a dark sky, so try the same view at blue hour.
Can I make a video from a night render?
Yes. Render to Video adds camera movement to a single frame, and Drone Shot produces a cinematic aerial video from a building image. Neither is a free walkthrough or a 3D animation. Because the video comes from one frame, window light, facade detail and the tone of the light may not stay exactly the same, so watch it end to end before using it.
Is a night render a substitute for a lighting design?
No. A night render is a presentation and decision image. It has no lux calculations, fixture layout, electrical plan or energy estimate, and it is not an official project document. Light pollution, light spill onto neighbors and glare are matters for local rules and a professional. When you show it to a client or buyer, label it as illustrative.